客户端开发(Python)
系统要求
在开始之前,请确保您的系统满足以下要求:
- Mac或Windows计算机
- 已安装最新的Python版本
- 已安装最新版本的uv
环境设置 首先,使用uv创建一个新的Python项目:
python
# Create project directory
uv init mcp-client
cd mcp-client

# Create virtual environment
uv venv

# Activate virtual environment
# On Windows:
.venv\Scripts\activate
# On Unix or MacOS:
source .venv/bin/activate

# Install required packages
uv add mcp anthropic python-dotenv

# Remove boilerplate files
rm hello.py

# Create our main file
touch client.py
设置您的 API 密钥
您需要从 Anthropic 控制台获取一个 Anthropic API 密钥。 创建一个 .env 文件来存储它:
bash
# Create .env file
touch .env
将你的密钥添加到 .env 文件中:
bash
ANTHROPIC_API_KEY=<your key here>将 .env 添加到你的 .gitignore 中:
bash
echo ".env" >> .gitignore注意
确保您的 ANTHROPIC_API_KEY 安全!
创建客户端
基本客户端结构
首先,让我们设置导入并创建基本客户端类:
python
import asyncio
from typing import Optional
from contextlib import AsyncExitStack

from mcp import ClientSession, StdioServerParameters
from mcp.client.stdio import stdio_client

from anthropic import Anthropic
from dotenv import load_dotenv

load_dotenv()  # load environment variables from .env

class MCPClient:
    def __init__(self):
        # Initialize session and client objects
        self.session: Optional[ClientSession] = None
        self.exit_stack = AsyncExitStack()
        self.anthropic = Anthropic()
    # methods will go here
服务器连接管理
接下来,我们将实现连接到 MCP 服务器的方法:
python
async def connect_to_server(self, server_script_path: str):
    """Connect to an MCP server

    Args:
        server_script_path: Path to the server script (.py or .js)
    """
    is_python = server_script_path.endswith('.py')
    is_js = server_script_path.endswith('.js')
    if not (is_python or is_js):
        raise ValueError("Server script must be a .py or .js file")

    command = "python" if is_python else "node"
    server_params = StdioServerParameters(
        command=command,
        args=[server_script_path],
        env=None
    )

    stdio_transport = await self.exit_stack.enter_async_context(stdio_client(server_params))
    self.stdio, self.write = stdio_transport
    self.session = await self.exit_stack.enter_async_context(ClientSession(self.stdio, self.write))

    await self.session.initialize()

    # List available tools
    response = await self.session.list_tools()
    tools = response.tools
    print("\nConnected to server with tools:", [tool.name for tool in tools])
查询处理逻辑
现在让我们添加处理查询和处理工具调用的核心功能:
python
async def process_query(self, query: str) -> str:
    """Process a query using Claude and available tools"""
    messages = [
        {
            "role": "user",
            "content": query
        }
    ]

    response = await self.session.list_tools()
    available_tools = [{
        "name": tool.name,
        "description": tool.description,
        "input_schema": tool.inputSchema
    } for tool in response.tools]

    # Initial Claude API call
    response = self.anthropic.messages.create(
        model="claude-3-5-sonnet-20241022",
        max_tokens=1000,
        messages=messages,
        tools=available_tools
    )

    # Process response and handle tool calls
    final_text = []

    assistant_message_content = []
    for content in response.content:
        if content.type == 'text':
            final_text.append(content.text)
            assistant_message_content.append(content)
        elif content.type == 'tool_use':
            tool_name = content.name
            tool_args = content.input

            # Execute tool call
            result = await self.session.call_tool(tool_name, tool_args)
            final_text.append(f"[Calling tool {tool_name} with args {tool_args}]")

            assistant_message_content.append(content)
            messages.append({
                "role": "assistant",
                "content": assistant_message_content
            })
            messages.append({
                "role": "user",
                "content": [
                    {
                        "type": "tool_result",
                        "tool_use_id": content.id,
                        "content": result.content
                    }
                ]
            })

            # Get next response from Claude
            response = self.anthropic.messages.create(
                model="claude-3-5-sonnet-20241022",
                max_tokens=1000,
                messages=messages,
                tools=available_tools
            )

            final_text.append(response.content[0].text)

    return "\n".join(final_text)
互动聊天界面
现在我们将添加聊天循环和清理功能:
python
async def chat_loop(self):
    """Run an interactive chat loop"""
    print("\nMCP Client Started!")
    print("Type your queries or 'quit' to exit.")

    while True:
        try:
            query = input("\nQuery: ").strip()

            if query.lower() == 'quit':
                break

            response = await self.process_query(query)
            print("\n" + response)

        except Exception as e:
            print(f"\nError: {str(e)}")

async def cleanup(self):
    """Clean up resources"""
    await self.exit_stack.aclose()
主入口点
最后,我们将添加主要执行逻辑:
python
async def main():
    if len(sys.argv) < 2:
        print("Usage: python client.py <path_to_server_script>")
        sys.exit(1)

    client = MCPClient()
    try:
        await client.connect_to_server(sys.argv[1])
        await client.chat_loop()
    finally:
        await client.cleanup()

if __name__ == "__main__":
    import sys
    asyncio.run(main())
您可以在这里找到完整的 client.py 文件。
关键组件说明
1. 客户端初始化
- MCPClient 类使用会话管理和 API 客户端进行初始化
- 使用 AsyncExitStack 进行适当的资源管理
- 为 Claude 交互配置 Anthropic 客户端
2. 服务器连接
- 支持 Python 和 Node.js 服务器
- 验证服务器脚本类型
- 设置适当的通信渠道
- 初始化会话并列出可用工具
3. 查询处理
- 维护对话上下文
- 处理 Claude 的响应和工具调用
- 管理 Claude 和工具之间的消息流
- 将结果组合成连贯的响应
4. 交互界面
- 提供简单的命令行界面
- 处理用户输入并显示响应
- 包括基本的错误处理
- 允许优雅退出
5. 资源管理
- 适当清理资源
- 连接问题的错误处理
- 优雅的关机程序
常见的自定义点
1. 工具处理
- 修改 process_query() 以处理特定的工具类型
- 为工具调用添加自定义错误处理
- 实现工具特定的响应格式
2. 响应处理
- 自定义工具结果的格式
- 添加响应过滤或转换
- 实现自定义日志记录
3. 用户界面
- 添加 GUI 或 веб 界面
- 实现丰富的控制台输出
- 添加命令历史或自动完成
运行客户端
要使用任何MCP服务器运行您的客户端:
bash
uv run client.py path/to/server.py # python server
uv run client.py path/to/build/index.js # node server
提示
如果您正在继续服务器快速入门的天气教程,那么您的命令可能看起来像这样:python client.py .../weather/src/weather/server.py
客户端将:
- 连接到指定的服务器
- 列出可用的工具
- 开始一个交互式聊天会话,在其中您可以:
- 输入查询
- 查看工具执行
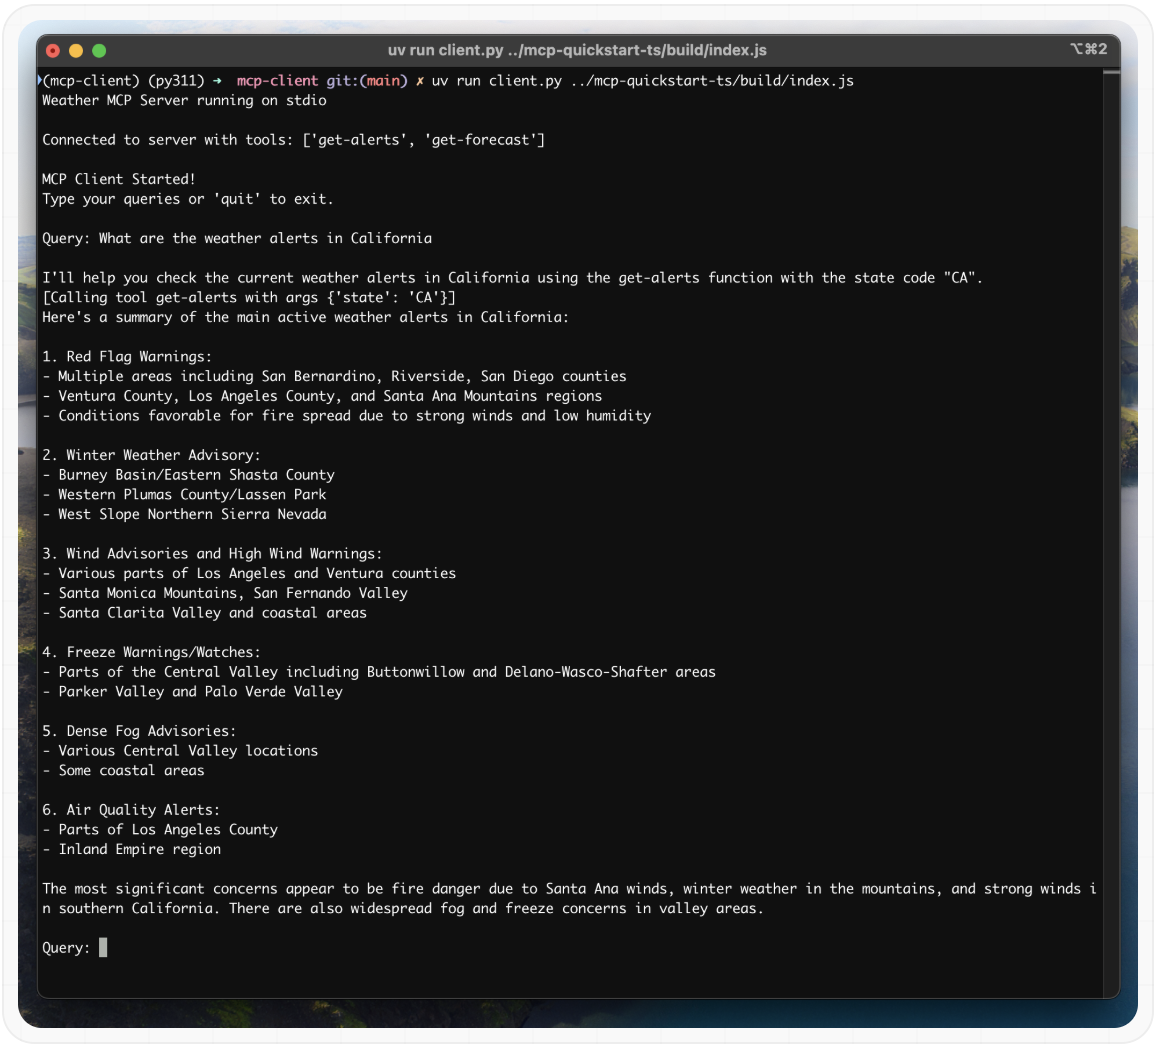
- 获取 Claude 的响应 以下是连接到气象服务器的快速入门示例:
它是如何工作的
当您提交查询时:
- 客户端从服务器获取可用工具列表
- 您的查询与工具描述一起发送到Claude
- Claude决定使用哪些工具(如果有的话)
- 客户端通过服务器执行任何请求的工具调用
- 结果被发送回Claude
- Claude提供自然语言响应
- 响应显示给您
最佳实践
1.错误处理
- 始终将工具调用包装在 try-catch 块中
- 提供有意义的错误消息
- 优雅地处理连接问题
2.资源管理
- 使用 AsyncExitStack 进行适当的清理
- 完成后关闭连接
- 处理服务器断开连接
3.安全性
- 在 .env 中安全存储 API 密钥
- 验证服务器响应
- 对工具权限保持谨慎
故障排除
服务器路径问题
- 请仔细检查服务器脚本的路径是否正确
- 如果相对路径无效,请使用绝对路径
- 对于Windows用户,请确保在路径中使用正斜杠 (/) 或转义反斜杠 ()
- 确认服务器文件具有正确的扩展名 (.py 用于 Python 或 .js 用于 Node.js)
正确路径使用的示例:
bash
# Relative path
uv run client.py ./server/weather.py

# Absolute path
uv run client.py /Users/username/projects/mcp-server/weather.py

# Windows path (either format works)
uv run client.py C:/projects/mcp-server/weather.py
uv run client.py C:\\projects\\mcp-server\\weather.py
响应时间
- 第一次响应可能需要多达 30 秒才能返回
- 这是正常的,发生在:
- 服务器正在初始化
- Claude 正在处理查询
- 工具正在执行
- 后续响应通常会更快
- 在最初的等待期间,请勿中断该过程
常见错误消息
如果您看到:
- FileNotFoundError : 检查您的服务器路径
- Connection refused : 确保服务器正在运行且路径正确
- Tool execution failed : 验证工具所需的环境变量是否已设置
- Timeout error : 考虑在您的客户端配置中增加超时时间